


TigerConnect Certifications
A short course on the use and features of TigerConnect. Read through the material below and take the short test at the bottom of the page.
In less than an hour, you can be a certified TigerConnect Super User.

Welcome to the TigerConnect Super User Certification, in this course you will learn about the different uses of TigerConnect and all of the features. This course will highlight important basic functions as well as premium features, such as Roles and Priority Messaging.
TigerConnect Product Features Training
-
Features
TigerConnect has many features and countless benefits. Here is a list highlighting a few.
Key Features
Delivery Confirmation:
With Delivery Confirmation, users will know instantly if messages have been delivered and read, helping teams work together more efficiently.
Message Forwarding:
Message Forwarding lets users share messages with colleagues, making it easy to bring experts and others into a conversation.
Delivery Escalation:
Connectivity issues inside buildings can hamper communication, but with TigerConnect’s Delivery Escalation, messages not delivered within five minutes automatically notify the recipient via SMS notification without message body text.
Do Not Disturb:
Similar to an out of office email reply, ‘Do Not Disturb’ lets colleagues know you are not available and gives you the opportunity to create a custom auto-reply message.
Secure Attachments:
TigerConnect’s desktop version can send files directly from the file storage system. TigerConnect’s mobile apps integrate with cloud storage apps such as iCloud, Box, Dropbox, Google Drive and others as long as the drive’s app is installed on the mobile device.
Key Benefits
Communication Kept Safe:
- Messages are encrypted end to end
- Administrator controls keep IT in charge
- Messages permanently delete after a set time
Transform Workflow Process:
- Accelerate employee communications
- Team collaboration for greater productivity
- Reduce miscommunication and errors
Comply with Industry Regulations:
- Satisfy HIPAA, SOX and HITrust requirements
- Stay Compliant in a Bring-your-own-device (BYOD) world
- Backed by TigerConnect’s million dollar compliance guarantee
Improved Care Environment:
- Employees are free to send and receive PHI (Protected Health Information)
- Less phone tag and reduction in antiquated communication channels, such as faxes and pagers.
- Better insight into patient care process allowing patient facing employees to better-set expectations and timelines
-
Download the App
TigerConnect is available to download on the iOS AppStore and the Google Play store for Android. We do not produce native apps for Blackberry or Windows mobile devices.
Our Desktop Application can be installed on Windows and Macintosh desktop computers. Our web console environment can be accessed on any computer with a web browser. The preferred mode of use for TigerConnect on desktop computers is the desktop app.
Download the Desktop app at: TigerConnect Downloads
-
Log In
Now that we have the application downloaded let’s get logged in.
We can log into TigerConnect with an e-mail, or a company provided username.
The username is typically used by facilities adding users from their internal Active Directories
When users log into TigerConnect for the first time they will have to create a password, that will be the password they use to log into any other instance of TigerConnect.
The workflow follows these steps:
- Tap Get Started
- **Android only** Tap ‘not now’ when asked to check for email information.
- Type an email or username on the login page.
- Follow the on-screen instructions to open your email account on the phone, or visit the email on a computer.
- Find the email from notifications@tigertext.com, asking you to reset your password.
- Click on the reset password link
- Create a password, it must have at least 8 characters, 1 capital letter, 1 special character, and 1 number.
- Return to the TigerConnect app and type your password.
- Activate your mobile number by tapping on the activate button then: for iOS tap the green arrow to send the pre-generated text, for android this is done automatically.
- Allow notifications from the app
- Allow the app to access the device’s contacts.
- Optional: select a four-digit pin then re-enter the pin to confirm it.
Once you have created your password all consecutive logins will skip steps 4-7.
If logging into a device which has already been logged into in the past you will skip steps 10-11.
When logging in to a desktop you will only be required to perform steps 3, 8.
Additional notes on possible customer experiences when logging in:
If an end user attempts to log into TigerConnect with an email which has not been provisioned ahead of time three possibilities can occur:
- The user will be rejected because the email domain they are using is part of an Active Directory sync. They will have to reach out to the facility IT team to get access to TigerConnect
- The user will be asked to create a password in the app. Then be placed into a ‘pending user’ state where they will have to verify their email address and will see a full organization name at the top of the app (i.e. HealthCare Inc.) but can only text the Admin broadcast list (this will have a blue icon next to it). An admin of the account will need to approve them from TigerConnect admin console.
- The user will create or join a freemium organization associated with their email domain, they will have to verify their email address and the org name will typically have the domain name of the email as it’s title (i.e. healthcare.com) This organization is not associated with a paid TigerConnect account.
-
Sending Messages
Now that we have downloaded and logged into the TigerConnect App, let’s get down to business and send a message!
There are many ways to send messages:
- You can send a message with a fresh start from the compose icon in the top right for iOS
 and bottom right for Android
 .
. - You can send a message from the Directory in iOS
 , or in the search field for Android
  . (Only Person to Person conversations can be created from here)
 - You can continue a conversation from the inbox of your TigerConnect account.
Sending a new message using the compose icon on iOS is easy:
- Tap on the compose icon in the top right.
- Type in the name of who you are looking to send the message to.
- Choose them from the list.

- Type the message in the “Write a message…” box at the bottom of the screen.
- Finally, tap on the red arrow to send the message.

Sending a new message on Android is just as simple:
- Tap on the plus icon in the bottom right.
- Tap on New Message from the options.
- Type in the username or choose them from the list.
- Tap on the check mark at the top right.
- Type your message in the “Write a message…” box.
- Finally, tap on the red arrow to send the message.
There are a few things to note about the message creation flow.
- The users generated in the scrolling list are not everyone in the directory. We load a portion of the users in the directory but not all, as some of our customers have thousands of users. To make sure our customers find the right person, type the user’s name or title to search for them.
- Searching in the directory with the create a new message option works just the same as in the Directory or Search fields, you can search for a name, title, and department.
- You can send a message with a fresh start from the compose icon in the top right for iOS
-
Message Anatomy
A TigerConnect message can carry an enormous amount of important information, whether it be a message to notify a hospitalist that the patient is having a lab drawn, or to notify an organ transport team that a new transplant is available for the next patient. A TigerConnect message carries very important content to its recipient and sender. However, there are many other critical details, let’s take a look at the anatomy of all TigerConnect messages.
Message Status
Easily our most important feature in the user interface, the message status tells users what to expect.
There are three statuses, Sent, Delivered and Read.
 Sent. This status tells us that the message has been received by the secure server and is en-route to our recipient’s device. If a message is lingering in the Sent status for an extended amount of time it typically means the recipient is not logged into TigerConnect, it could also mean that they are not covered by a cellular or wifi data connection.
Delivered. This status tells us that the secure server was able to successfully deliver the message to our desired recipient, we know that the recipient’s device has notified them and that they have our unread message pending in their inbox.

Read. This status is the one we are all waiting for, it tells us that the recipient has opened the message and has read its contents.
 Read. (Group) The group read status shows us a numbered ratio, the number of users who have read by the total number in the group. Users can tap on this status and see a detailed view of who has read the message.
Message Lifespan
A unique feature of TigerConnect is the message lifespan found at the bottom of every message. TigerConnect messages will automatically delete from the app after a designated length of time. Only the administrator of the account can adjust this timeframe. The various values run from 5 minutes to 30 days. Most of our customers use no less than 5 days, as any shorter would make the continuation of care and the patient care cycle difficult to manage.
Time Stamp
Every message in TigerConnect has a time stamp on the lower left. This time stamp shows you and the recipient what time the message was created, not delivered or read. In group messages, the read details will show you delivered and read times as well as created time.
-
Message Actions
We have learned how to send a message and what type of critical information is in a message. Now, how about we learn all of the actions we can use on a message?

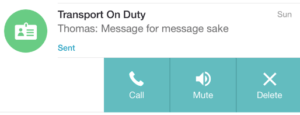
Message actions are the different commands we can give to a message after we have sent it, or received it. To use them, tap and hold on any message in your conversation. First, we will go over the message actions we can place on a message we have sent.
Outgoing Message Actions
These are actions that you can place on messages you have sent.
- Resend
- Recall
- Forward
- Details
Resend: We can resend a message, verbatim, this action does not let us change the body text. A modified version of this action is available if Priority messaging is turned on allowing the sender to resend a standard message as a priority message.
Recall: We can recall or take back a message that has been sent. There are obvious applications here, such as erasing a message to the wrong person, however, clinically speaking this feature can definitely save lives. We have all seen auto-correct wreak havoc on our intended words, changing “let’s go eat” to “pets with feet”, this feature ensures that prescription amounts are not accidentally sent with an extra 0 (10mg vs 100mg) or a wrong room number for a consult.
Forward: Forwarding a message from one person to another will send the new forwarded message with the original sender’s name in bold. This is to retain accountability as well as offer the recipient an understanding of who they can follow up directly with if questions arise, taking the middle-person out of the equation and improving response time and care cycles. The sender’s name is a link that will show users the sender’s profile.
Details: Give the user important information for troubleshooting, such as the unique message token, server date, sender token, recipient token, and status. However, most importantly, message details have a button to contact customer support directly and will autofill all of these details along with device and user details in an email to prosupport@tigertext.com our customer support team.
Incoming Message Actions
These are actions that can be placed on messages you have received.
- Delete
- Forward
- Details
Delete: This is not message recall, delete only deletes the message from your side of the conversation.
Forward: Same action from the outgoing message, however mostly used on incoming messages.
Details: Same actions from the outgoing message, however rarely used on messages received.
-
Message Attachments
We can send many different types of attachments with TigerConnect from images to recorded audio.

Here is a list of supported attachments:
- Image
- Video
- Current location with map
- Word document (.doc)
- Audio recording
All attachments are sent with the same encryption as a standard message and are compliant. TigerConnect has a 10MB message size limit, this will restrict the length of videos and audio recordings.
Pictures
Let’s look at how to send these attachments starting with sending an image that we make with the app.
- Start at the attachment bar.

- Tap on the camera icon.

- Frame the image you want to take
- Take the image by tapping the white button at the bottom of the screen.
- Tap “use photo”.
- (optional) Add text to the message box.
- Tap the red arrow at the right to send.
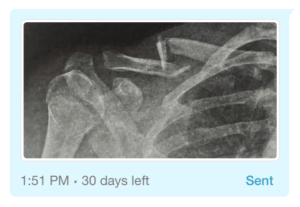
Photo messages function the same as other messages, they can have all message actions performed on them. The image is not saved to the user’s device, this makes it possible to send compliant clinical images, such as EKG, x-ray, patient condition, wounds, surgical sites and anything with PHI on it.
Location
How about sharing my location? We can send our current location with just two taps.
- Tap on the pin icon in the attachments bar.

- Tap proceed.

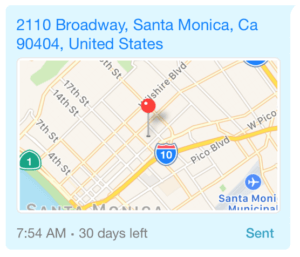
The app will find your location and send the address, this is not a tracking mechanism, it simply shares your current address. This feature does not share specific GPS coordinates or altitude, meaning if you are in a big hospital and want to send your location, such as wing and floor, this feature will only send your current address. This feature works best for Home Health customers, or other traveling field specialties.
Documents
Sending documents is easy from your mobile device, we have integrations with all the major cloud drive providers, such as Google Drive, iCloud Drive, Box, and more. You will need to install the cloud drive app on your device and sign in, after that you can choose it from the attachments bar, and send a saved file in TigerConnect.
Let’s walk through the process.
- Tap on the dog-eared page on the left side of the attachment bar.

- Choose the cloud drive.
- Select the account.
- Navigate to the file location.
- Tap on the desired document.
- Tap the red arrow to send the attachment.
Recorded Audio
Recording audio can be very helpful for our customers, whether it’s a nurse sending a read back, a radiologist’s scan interpretation, or a patient’s speech pattern during stroke recovery.
Recording audio starts with the microphone in the attachments bar.
- Tap on the microphone on the far right of the attachment bar.

- Tap on the red microphone to start the recording.

- Tap on the stop recording icon when finished.

- (optional) Playback the recorded audio.

- Tap on the red arrow to send the message.
-
Group Messages
Care Coordination is at the root of TigerConnect’s Mission, our app connects the patient care team with each other. Group message is easily at the top of the list for features with the biggest impact on our mission and the patient care cycle.
Groups are private collaborative environments that can be created by any user in the directory for any reason or need. Only the users participating in the group can see the group. Any messages sent or received are only accessible by those in the group. If a user is added to a group after the group has been created, that user will not see any previous messages in the group. There is a 100 user limit on how many users can be added to a group. Group titles are compliant, just as the messages sent within them.
Groups have an orange square as an icon by default, this can be customized to any picture, however, groups always have square icons where person to person direct messages have circle icons. Groups will stay in all participant’s inbox, whether the messages have all expired or not.

Creating a Group:
We can create groups in many different ways:
- Creating a new message and adding multiple users in the “to:” field.
- Tapping the plus icon
 in the group tab.
- Tapping new group from the composition menu
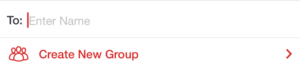
- Tapping new group from the composition options (android)

Group Messages:
We have talked about group message read status, but let’s revisit that and look at other message details in a group conversation.
Messages sent to a group will have a numbered read status, showing how many people in the group have read your message.
Messages will have the user’s avatar next to them, as well as their name at the top of the message, for better identification in a busy text exchange.

There are also notifications called “bangs” in a group conversation which show us things like who was added to the group and who has removed a user from the group.
Group Details:
Everyone in a group can manage and change the members as well as the group details.
To view group details tap on the square in the top right corner of the group conversation.

In this menu we can do the following:
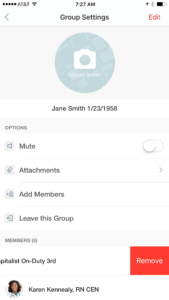
-Change the avatar
-Change the group name
-Mute the conversation
-View attachments
-Add members
-Remove members
-Leave the group
-
Broadcast Messages
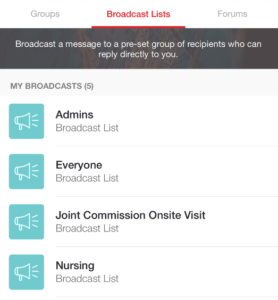
Broadcast lists are a notification feature in TigerConnect, an administrator can set a broadcast list with a title and a list of recipients. The users on the list are not visible to end users, but anyone in the directory can send to the list. The sender can only see that they have sent to the list, but any response will come back to the sender as a person to person message. Broadcast lists are great for shift change updates, system downtimes, code notifications, admission or discharge notifications.
Tap on the list to send a message to it or search for the name in the compose menu.
-
Forum Messages
TigerConnect Forums are a great way to get a group of people involved with a topic such as IT Downtime notices, or procedure changes.

Forums function like an open group.
Anyone in the directory can create a forum.
Anyone in the directory can join a forum.
Anyone in a forum can add another user.
All messages (within the lifespan) are available for users to view even those sent prior to them joining.
Forums DO NOT provide a delivery or read confirmation on messages.
To join a Forum
1. Tap on the group tab in the bottom left (iOS) or top center (Android)
2. Tap forums in the top tab bar
3. Tap join to the right of the Forum name
4. Send a message to the forum
-
Settings
TigerConnect Settings give users the opportunity to change some behaviors of the app, such as notification sound, and avatar. Settings are located in the bottom right corner of the iOS app and in the top right of the Android app, both are identified with a gear icon.

User information: Change your avatar, display name, title, departmentStatus: Passive line of information that lives beneath your display name in a person to person conversation
Do Not Disturb: *See DND Section
Message Lifespan indicator: Can only be adjusted by users while in the Contacts org
Alert Sound: Tiger is a good one to choose
In-App Alert Sound: Turn on audible notifications while the app is open.
PIN Lock: Can be opted in on by users or required by administrators
Change Password: Only used by manually provisioned users
Organizations: A list of organizations in which the user is provisioned
Device Contacts: Manage TigerConnect’s access to your contacts list necessary for Click to Call to work properly
Quick Reply: Update or change your quick reply selections
Help: View FAQs, Contact support, Training materials
About: Application version and Terms of use
Logout: logs the user out of TigerConnect, erases all message content, and will not notify users of new messages.
-
Do Not Disturb
Do Not Disturb provides users with an easy way to momentarily silence notifications from TigerConnect, whether it be for a patient interaction, a day off, or a full-length vacation. Do Not Disturb, or DND, silences all notifications to TigerConnect, provides the user an option to set up a custom auto-reply, and even forward messages automatically.
Turning on DND
- Tap on the settings icon in the bottom right of the app (iOS) or the top right (android)
- Tap or swipe the switch to the right of DND

Customized Auto-Reply
- Tap in the field of text below the DND switch
- Type the desired message
- Tap ‘done’ on the keyboard. (if users don’t tap ‘done’ the message will not be saved)

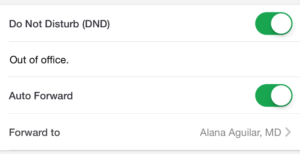
Enable Auto-Forward
- Tap or swipe the switch to the right of Auto-Forward
- Choose the desired recipient
Note*
- The chosen user will receive an automatic message informing them that you have set them as your Auto-Forward.
- Other users will see who you are forwarding to in your conversation

- Auto-Reply and Auto-Forward do not function for group messages and broadcast lists.
- Users on duty in a Role cannot set DND.
-
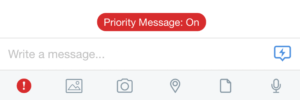
Priority Messages
Priority Messaging is a Premium feature on TigerConnect that helps users emphasize their most urgent messages and encourage quicker response times from their recipients. Priority Messages have a unique tone and bright red color to ensure they stand out. The messages always show up on top of the inbox so it can’t be missed.
Sending a Priority Message
There are three ways to send a Priority Message:
Create a new message
- Tap or click the Priority Message button
- Type your message and send
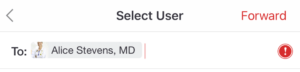
Forward a message to another user
- Tap and hold on the message
- Tap Forward
- Tap the Priority Message button to the right of the ‘to’ field,
- Choose the recipient
- Tap Forward
Resending as a Priority Message
- Tap and hold on your message
- Tap Resend as Priority
Note*
Priority Messages can be sent in any message on TigerConnect; Roles, Groups, Broadcast lists, Person-to-person. If you are the recipient of a Priority Message, the message will have a distinct tone and will appear differently within your inbox with a red border. The message will stick to the top of your inbox until it is read, regardless of whether new standard messages are received after.
-
Roles: What is it?
The Roles Feature
In a large hospital system, having instant access to the right on-call specialist can save valuable time while avoiding rounds of phone tag and errant, unwelcome calls to off-duty staff members. Clinical staff and unit managers often waste valuable time trying to identify and contact on-call specialists and techs, struggling with whiteboards and spreadsheets just to locate the right physician or tech. TigerConnect’s Roles feature lets healthcare staff look up specialists and other colleagues by role or department rather than by name.
Roles give nurses the confidence and reassurance that they can get an answer quickly. Roles give providers the peace of mind that they haven’t missed a crucial page about a patient need. Roles enable the whole healthcare setting to effectively support a patient’s journey to recovery and wellness.
-
Roles: Sending Messages to Roles
Sending messages to a Role can be done in two different ways.
- From the compose icons.
- From the roles directory.


Sending as a new message
1. Tap on the composition icon.
2. Type the role name, or scroll to view the available roles
3. Type a message
4. Tap the red arrow to send the message
*Note:
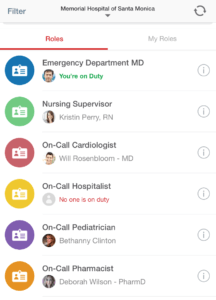
- Roles will show at the top of the suggested users in the composition menu.
- Roles will always have a colored avatar with a badge icon.
- Beneath the role name we see who is currently on-duty.
 Sending from the Roles Directory
1. Tap on the roles icon in the bottom of the screen (iOS) or the top right (Android).
2. Scroll or search through the Roles directory list.
3. (iOS) tap on the role title, (Android) tap on the role title, then tap ‘message role’ on the role detail page.
4. Type the message
5. Tap the red arrow to send the message.
- From the compose icons.
-
Roles: Managing and Opting into a Role
We just learned about how to send a message to a role. Such as a Nurse contacting a Physician, or as a Hospitalist contacting a Specialist.
Now we are going to look at how we can manage our roles for which we want to go on-duty or save for later.
Opting In and Out of a Role
- Tap on the role tab at the bottom of the page (iOS) or the top right (android)
- Search for the desired role or scroll through the list
- Tap on the ( i ) to the right of the role.

- Swipe on the area at the bottom of the page to opt in to a role.

- Return to the role page and swipe to opt-out of a role.

- Choose a user from the directory to replace the vacated role.
Sending Messages as a Role

When users opt into a role they inherit all of the previous messages that role has participated in.
 The inbox will have badges on conversations showing which are from the role and which are not.
When composing a new message while on-duty for a role, users will have to choose whether to send as the role or as the standard account.
To help manage roles that are commonly used the ‘My Roles’ tab gives users a place to save important roles and any role users are on-duty for will show here.
Flagging a role and saving it in the ‘My Roles’ tab
- Tap on the role tab at the bottom of the page (iOS) or the top right (Android)
- Search for the desired role or scroll through the list
- Tap on the ( i ) to the right of the role.
- Tap on the flag icon where it says ‘Save to My Roles’

- Now the role will show in the ‘My Roles’ tab

- Tap on the role tab at the bottom of the page
-
Roles: Automated Roles Assignments
Clinical staff and unit managers often waste valuable time trying to identify and contact on-call specialists and techs, struggling with whiteboards and spreadsheets just to locate the right physician or tech.
TigerConnect’s Roles feature lets healthcare staff look up specialists and other colleagues by role or department rather than by name. However, when paired with a hospital’s electronic scheduling system, the Roles feature becomes a dynamically populated directory where staff can text role owners to instantly communicate the details of a request or situation.
With Role-based Scheduling Automation, shift assignments are automatically updated in the TigerConnect directory so users simply show up and start their shifts with both parties receiving notifications to indicate the shift change. Plus, past conversations are captured to give the new shift owner added context about the patient.
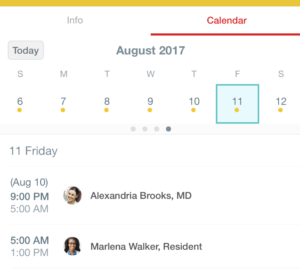
Calendar ViewsNow, staff can see current or upcoming shifts – including their own – in a simple yet elegant calendar view right from the TigerConnect app.
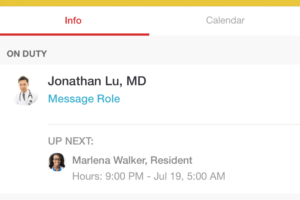
Details ScreenThe information screen for Roles provides details about the role, including the current owner, and a swipe option so a user can opt in or out of the role manually.
Fast Setup
Scheduling Integration with TigerConnect can be set up quickly, giving admins full control, including a toggle switch for turning Roles on or off. Integrating with solutions such as AMiON and SPOK to seamlessly provide customers with a scalable solution.
-
Click to Call
Click to Call enables a TigerConnect user with an activated mobile device the opportunity to make a secure phone call to another mobile user right from the app.
Making a Call
There are a few different ways to make a call
From a Person to Person conversation
- Tap on the conversation in the inbox
- Tap on the phone in the top right of the conversation

From the inbox
1. Swipe from right to left (iOS) tap and hold (Android) on the conversation.
2. Tap call
From a group conversation
- Tap on the avatar of the desired user

- Tap the call icon in the user profile

Receiving a Call
When users tap on the call icon, TigerConnect sends data via a data connection to the recipient’s device containing the caller’s contact information, this ensures when the call comes through on the recipient’s end they will see the caller’s name. But wait, can’t a phone call be made without a data connection, what then? Our team has built this feature so that if there is not a data connection to send the contact information we will see the facility name instead. Worst case scenario with data connections the recipient will see something like “General Hospital via TigerConnect.” If a call is missed there will be two notifications, one from the phone app, and one from TigerConnect, tap on the TigerConnect notification to jump to the conversation and call the person back. Android has a convenient ‘call back’ action right on the notification, Android also has a call log in the inbox screen to view all of the calls made or received with that device.
Note*
Click to Call will not work on WIFI only devices, Click to Call requires a phone number attached to the device and the number to be verified with TigerConnect, verification happens when the text is sent to our servers during the login process on a mobile device.
There is a stipulation to make here, the users must have allowed TigerConnect to access contacts. Make sure that Contact Matching is on in the TigerConnect Settings under the Contacts menu. When individuals are using more than one phone, TigerConnect will call to the number with the lowest numerical value, for instance, if you have a 310 area code and a 605 area code TigerConnect will only call the 310 number.
-
TigerPage
- TigerPage is a feature TigerConnect offers to users in which they can have a phone number set to their user account by a TigerConnect Professional Services team member. This number can then be used to receive pages, voicemail pages, and text pages. It can be used for improved incoming patient communication, or to replace an existing paging policy, although paging systems can be replaced with simple turn-key integrations that our Professional Services team can set up.
When a page is received by the TigerPage interface the information is routed to the user.
Pages can come in three ways.
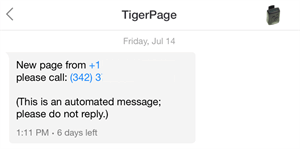 1. Call back number (shown)
2. Voice Message with transcript and audio recording
3. Text message
-
Certification Test
So, you think you are ready to begin the Certification Test?
If so, just click the button below. You’ve got this! Good Luck.